| Return shipping will be paid by | Seller |
|---|---|
| Returns Accepted | Returns Accepted |
| Item must be returned within | 60 Days |
| Refund will be given as | Money Back |
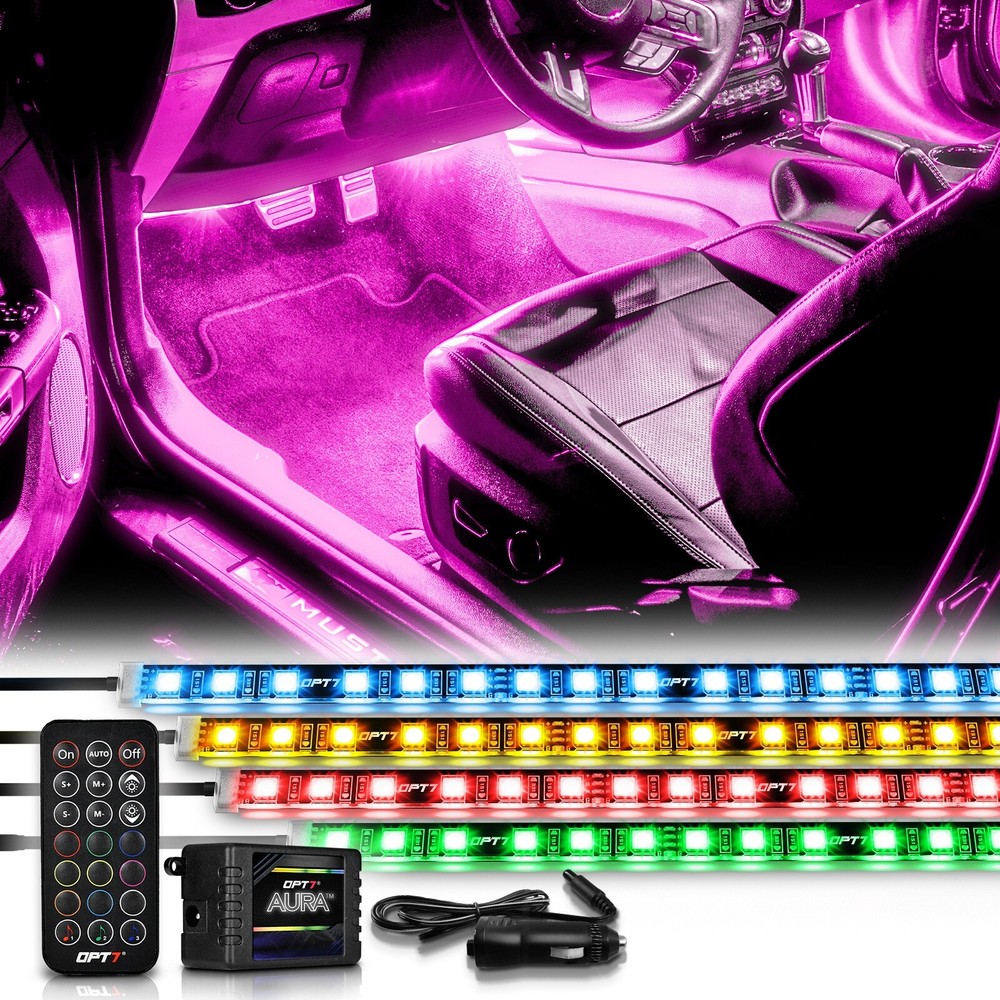
| Model | Aura Interior Kit |
| Lighting Type | Light Strip |
| LED Color | Red, Blue, Yellow, Green, Purple, Orange, Pink |
| Includes | (4) 12-Inch Smart-Color LED Strips, 1 Remote |
| UPC | 710552407980 |
| Surface Finish | Silicone |
| Bundle Type | Complete Kit |
| LED Count | 18 Smart-Color LEDs per strip |
| Warranty Length | 12 Months / 1 Year Warranty |
| Size | 12-Inch LED Strips |
| Manufacturer Part Number | AURA-INTERIOR-4PC-SINGLE-ROW-KIT-G3 |
| Brand | OPT7 Lighting |
| Color | All Colors Red Orange Yellow Green Blue Purple etc. |
| Country of Manufacture | United States |
| MPN | AURA-INTERIOR-4PC-SINGLE-ROW-KIT-G3 |
| Lighting Technology | LED |
Check the listing for details. OPT7 Full Color LED Interior Car Kit Under Dash Footwell Seats Inside Lighting. Color: All Colors Red Orange Yellow Green Blue Purple etc., Condition: New. Listed at 39.99 USD. AURA Original Kit Included: 1 x 21-Key Handheld Remote 1 x Cigarette Power Adapter 1 x AURA V2 Control Box (O) + 4-Pin Round RGB Pre-Attached Connectors 4 x 12" Single Row LED Strips with Adhesive Back 2 x 5ft + 2 x 10ft Light Strip Extension Wire (4PC) 1 x Pack of Mounting Kit and Zip Ties Waterproof Connectors are here to stay! Get OPT7s AURA Interior game-changing lighting system that installs in minutes and lasts for years to come! Automotive Adhesive Tape Our premium strip kits use strong binding tape for a lasting hold you can trust. Tip on applying adhesive LED strips securely: 1. To prep the area you wish to mount the LED Strip. Wash the installation point with warm water, then wipe it dry. 2. Dampen a clean cloth in warm water, then scrub the surface to remove debris. Any grime left behind could prevent the LEDs from sticking, so thoroughly clean the surface until it’s free of dirt and scuff marks. 3. Remove any moisture left over with a clean, dry cloth or give the surface 30 minutes to air dry. Next, use the adhesive booster that we provide to wipe the area for a ready to stick surface. 4. Peel the adhesive backing off and press the LEDs in place. LED lights are like stickers, so wait until you’re ready to put them on the wall before pulling the backing off. It’s best to do this a little at a time. Start at one end of the surface, peeling the backing off of the initial LED light. Position it, press it flat by hand, then continue placing the rest of the strip. Take your time. Make sure the LEDs are in the right place so you don’t have to move them later. 5. Align the arrows on the pins to ensure secure connections during installation. This step is crucial as it prevents improper installation, which has been causing color issues for some users. Unfortunately, your browser does not support videos.
You may also like